User Tools
Sidebar
using_rota
The CareFree Rota
The Rota can be accessed from the main menu:

The Rota screen is probably the most important tool within CareFree, this is where the coordinators will spend the majority of time in CareFree adding, deleting and editing calls.
What happens on the rota directly impacts other parts of the system, so its crucial that when staff are working on the rotas they understand what they are trying to achieve and execute that correctly.
This is what the main rota screen looks like:

- This is the branch and category selection, choose options from these drop downs to filter the lists in 2.
- This is the main list. Clicking on clients or carers will show you their rota. Use option 1 to filter this list.
- Date selection, you can advance or go back in time from this area. Use the up/down buttons to select a week ahead or a week behind. You can always press “Mon” to return you to the current week.
- Calls are placed on the rota at the time they are due, see below for all the options available on a call.
- Selection between the rota screen and away periods. Away periods are things like holidays/sickness.
- This is whats knows as the “working mode” and its very important! You want to be in the correct working mode before making changes to the calls as “This week and beyond” will make changes not only to the single call you have selected, but to every other call which is part of that package.
- This area shows you details about rotations. R2(rotation 2) = W2 (week 2). Its an indication of what week you are currently looking at on the rota when dealing with rotational calls.
- This allows you to change the rota view from carers to clients, but also notice you have other areas like runs and a day view.
When you right click on a call more options are presented:

1) This allows you to select multiple calls, actions can then be carried out on more than one.
2) View client and carer details will take you directly to the client or carer screens, more information can be found on these in the left hand panel.
3) Show unallocated allows you to highlight a portion of time and show unallocated calls for that period, really useful when trying to allocate a call to a carer.
4) This button allows you to allocate the call
5) Opposite of above.
6) Its also possible to add new calls from the Rota, you can highlight a portion of time and then use this tool to make a call which can be added to the persons package.
7) Away periods allow you to add client/carer away periods for a carer this might be a holiday, for a client you might be adding something along the lines of hospital or respite.
Other Sections: - You will notice there are a few more areas on the right click, for instance the right click context menu allows you to setup double up calls. You can also set different intervals for the rota, so if its makes more sense to see time in 15 minutes blocks, or hour blocks, make sure to change the intervals using the right click menu.
There are other options to view the rota slightly differently, for instance you have the option to show using Actual times, this reads data from ECM and displays what has actually been delivered. You can also turn on show package, which will give you an indication when a call has been changed from its “original” call time. View intervals is another useful tool as by default the rota timings are in half hour blocks.
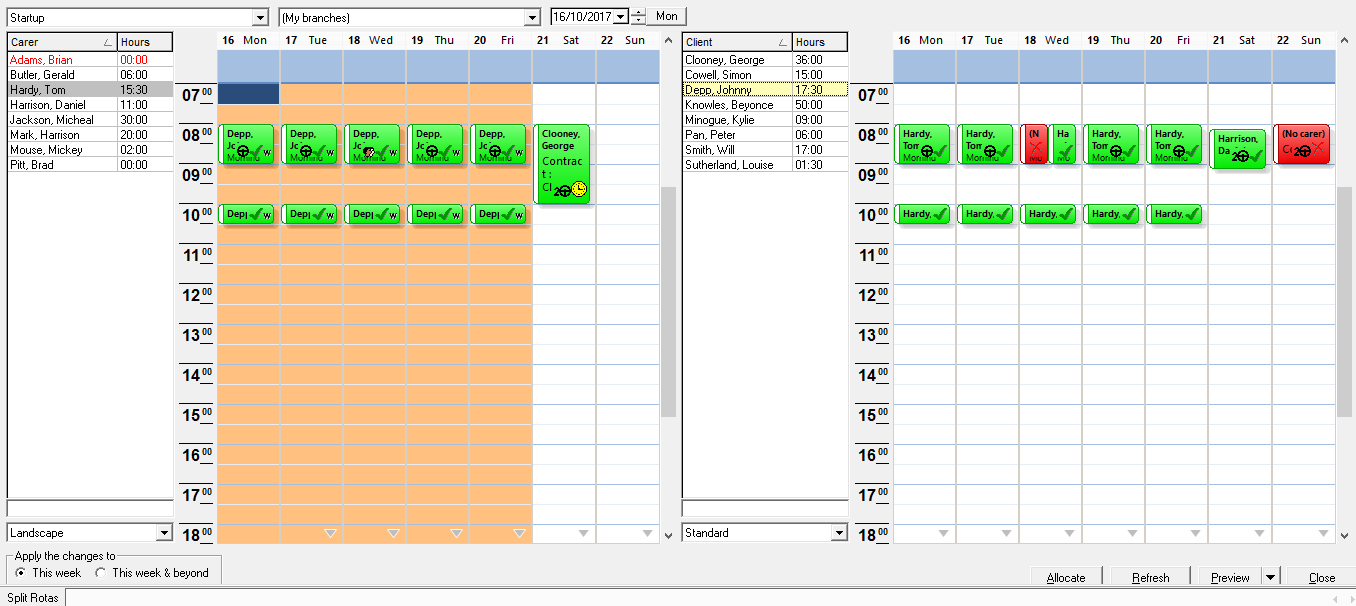
Rota Split Screen
You might prefer to work with both rotas side by side (carers and clients). The rota will work in exactly the same way but does provide the benefit of being able to see changes across both sides.
Some people also find it helps to see where gaps are and this provides the benefit of being able to fill them easier as its more visual. There are also other shortcuts with the rotas split screen, for instance if you have the carer you want to allocate to a call selected on the left hand side, then you will be provided a quick select tool to choose that carer when allocating the call to the client.
To try the split screen view click View from the top toolbar, and choose “Rota split screen”. You will see a screen which looks like this:
(Click on the image to enlarge)
If you prefer this way or working you can enable rota split screen as your default rota view, meaning that when you click on the Rotas button in CareFree it will show the split screen view instead. This is done via Tools, Options and settings, then Personal options. Once in personal options under General & Rostering you want to tick the option for “Use the split screen as the default”. Apply and Save the changes.
using_rota.txt · Last modified: 2018/01/08 12:01 by cfadmin